|
|
|
Suncoast Porsche PCM 2.1 Install (CDR-24 Radio Removal)
|
|
|
|
Reviews
|
Views
|
Date of last review
|
|
32
|
67555
|
Thu May 17, 2012
|
|
 |
|
Recommended By
|
Average Price
|
Average Rating
|
|
94% of reviewers
|
$1,125.00
|
8.8
|
|
|
|

|
|
Description:
|
I would first like to start this article by thanking one of our sponsors - Suncoast Porsche - http://www.e-partssales.com for providing a PCM unit at incredibly low pricing! If you are looking for a PCM unit or other Porsche parts, give Ric Knab a call and tell him you saw it here on the Cayman Club site! I would also like to comment that the PCM unit arrived in a box that Porsche had packed that was inside another box that Suncoast packed so the unit was well padded and arrived just fine. After opening the box this is what I found:
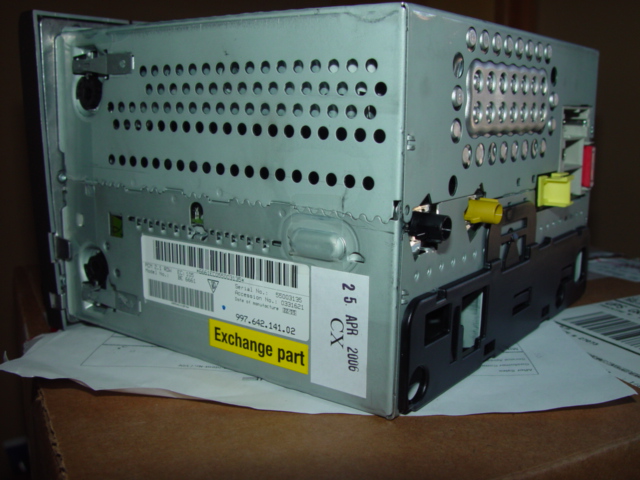
Note the part # and date on the image above. My car was built in Dec 05, so this unit is newer than my car which is what you want to guarantee compatibility, in fact what you want to do and what I did was provide my VIN# to Suncoast and they contacted Porsche in Germany to make sure I would receive the proper part. Here is the back of the unit which as we will see later looks the same as the back of the CDR-24 with one small difference.
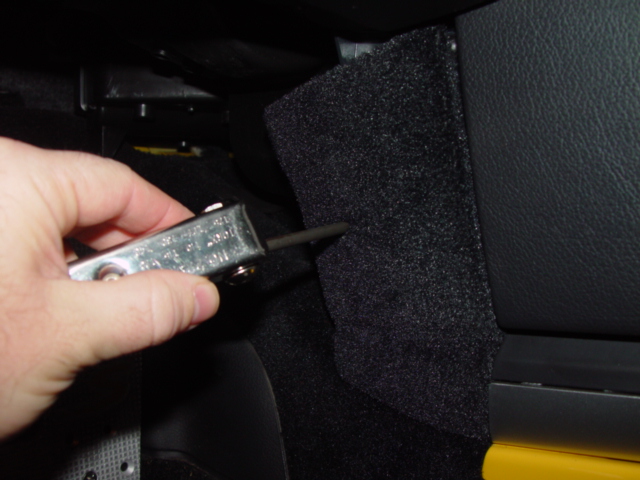
So now it is time to start installing the unit. I had taken my radio out previously when Stefan of Mods4Cars had been testing CAN bus connections and looking for ways to tap into the MOST bus so it was simply a matter or remembering and documenting the steps. The first step is to remove the carpeted end-cap pieces in either footwell. I started with the passenger footwell shown here.
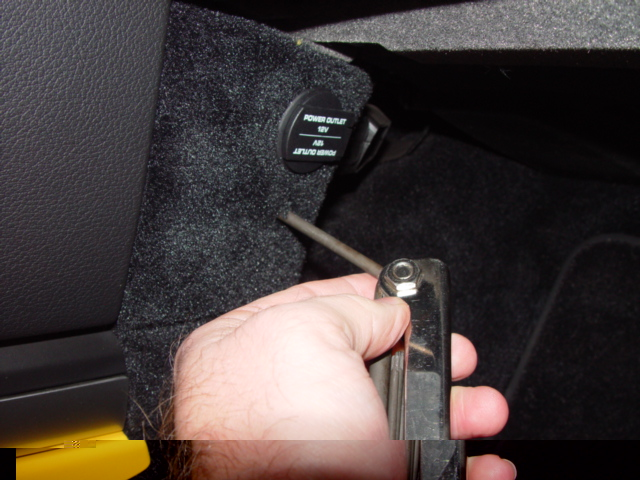
Just below the power socket there is a Torx head bolt that hold this end-cap down. Unfortunately I forgot to write down the Torx size but this was the largest Torx head bolt in the whole process. It was a standard size that I had in my tool set. Simply take the bolt out and set the end-cap to the side which will expose two smaller torx screws that hold the center stack leather trim pieces in place as shown in this next photo:
In this next photo you will see the 2 torx screws are removed and I am gently pulling out on the center stack leather (or plastic in my case since I don't have full leather interior) piece starting at the bottom and hinging outward towards the top.

Here is the backside of the panel piece which has now been removed. Note that there are 3 clips that snap into clip holders (the yellowish-green items still in the dash) and it may take a bit of a tug to get the last clip out.

Let's move on over to the driver's side now, ok driver's side in the U.S. anyway.  The same process takes place here, start with end-cap removal. The same process takes place here, start with end-cap removal.

Then panel removal:

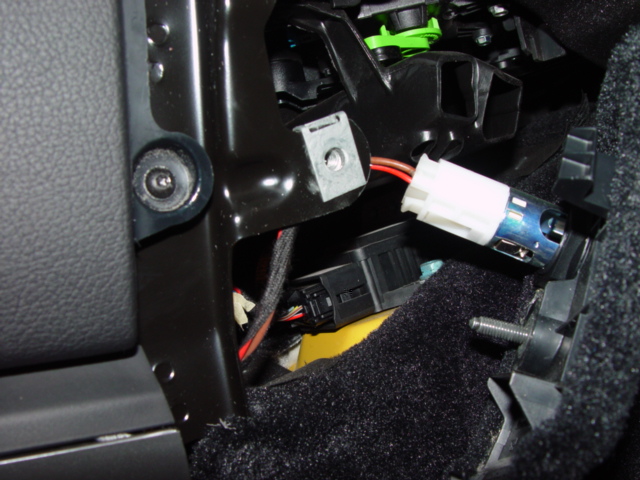
Now we get into a bit more detail, it isn't hard but there are some tricks you can learn here to make your life a bit easier. First off, in this next picture notice the location of this clip retainer near the bottom of the CDR-24 unit. We will use that as a reference point for the following image and description.

Now let's look BEHIND where that clip is on the SIDE of the radio head unit near the bottom of the head unit and you should see the following:
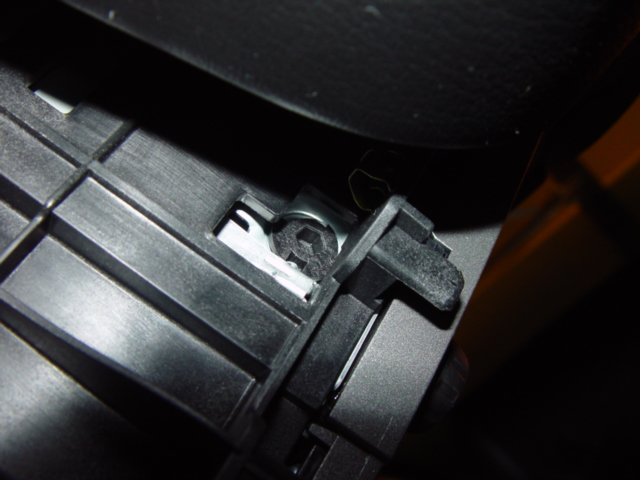
Pay close attention to that picture. What you are seeing is a black round disk with an allen wrench hole in it, I think someone in the forum said it was a #5 allen wrench size and just below that black disk is an aluminum lever arm. The way it works is that you put an allen wrench (or in our case a thin screwdriver) into the hole in the black disk and rotate the disk 90 degrees to lock the aluminum lever arm down (compressed).
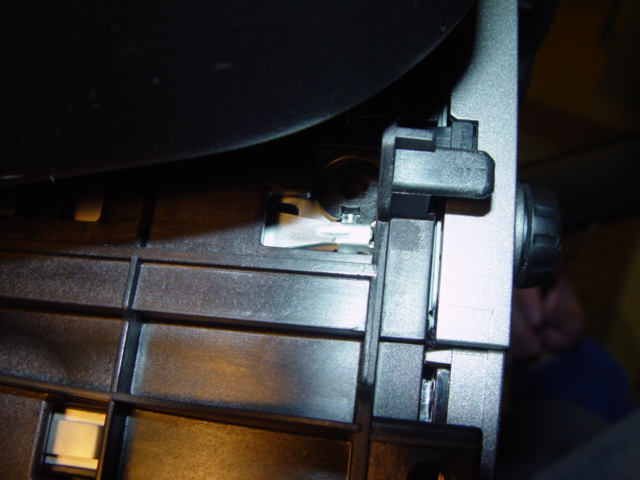
Notice the notch in the black circle piece, that notch allows the aluminum arm to spring outwards (towards the camera) and lock the radio head unit into place. When you rotate the black disk (not shown rotated in this picture) it will compress the spring loaded aluminum arm and allow you to slide the radio out.
There are 4 of these in total, 2 on each side!
This next image shows the technique we used, we held the aluminum clip down with a thin screwdriver taking the tension off the black disk which allowed us to rotate the black disk with our finger until we could let up on the aluminum arm and it was still in the compressed mode because we had rotated the disk.
We just didn't see a good way to get an allen wrench into the hole at some of the angles we were faced with so we improvised. Do whatever you feel works best for you, but it is hopefully clear how these retaining clips work. So you are ready to pull the radio out now right? Well not just yet...
Porsche didn't want the radio removal to be too easy for thieves so it also put in this retaining bolt/screw that had to be removed. I'm sure it is probably metric, but I didn't have any tiny open ended wrenches in metric so we used a 9/32 open end wrench and that worked fine.
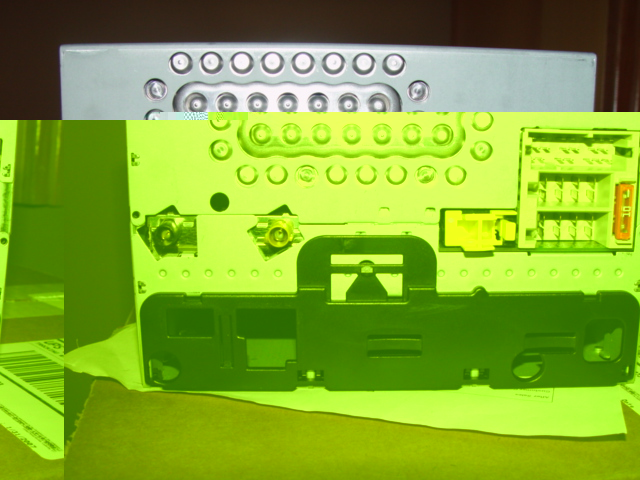
Now you can pull the radio out! It might take a little bit of tugging and wiggling but as long as the 4 clips are compressed it should slide out. We actually tool out the HVAC control unit below it first which is only held in by 2 clips just to give ourselves more room and to see where anything might be hanging up and to prevent dropping the radio on it! Again, not necessary but we did it anyway. Here is the backside of the CDR-24 unit with all the wires attached. The 2 orange wires are actually the MOST fiber optic system wires.
So let's compare, can you spot the difference or tell which unit is which? Ok I will tell you the PCM unit is on the right and the only difference we saw was the 2nd antenna connection (yellow plastic fitting near center of unit) which is blocked off in the CDR-24 unit. My gut is that it may be for the GPS antenna connection but that is just a guess that I haven't verified yet since I'm not installing NAV yet.
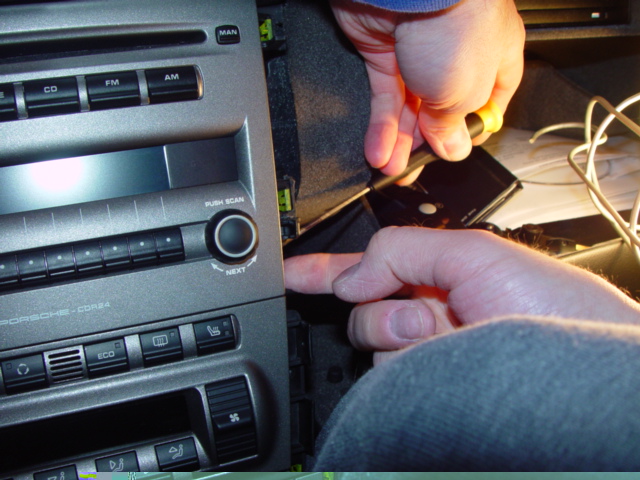
So at this point we plugged all the wires in and turned on the key and the unit came to life right away, albeit in German so we had to go to the menu and select US English.
Here the unit is installed and we are sliding the HVAC unit back in below it.
.JPG)
So how does it work? Great with a couple of minor exceptions that I am going to the dealer to get rectified. First, when I turn it on I get an error message that I can cancel that says I have no Navigation or Phone unit installed. What needs to be done is to turn those off using a PIWIS machine at your local Porsche dealer. Additionally, the sport chrono bar graphs are not showing up so likewise that needs to be turned on, also using a PIWIS. Now here's the kicker, to turn those items on or off in PIWIS is not just a simple PIWIS setting, there is a CODE involved. Your dealership will have to send your VIN# to Porsche and Porsche will respond with a code # that the service person can put into the PIWIS to activate or deactivate items in PCM. Seems silly I know, but I guess Porsche does it to keep track of the configurations of our cars. My car is scheduled to go in on Monday or the PIWIS work so I'll attempt to capture some photos of the PIWIS screens needed.
I did burn a CD with MP3's and it played just fine, recognizing the folders and album titles and authors etc. I was most pleased with that. I may add NAV to this later as well as a Dension unit but for now everything is working great. If you have any questions just ask them below or in the forum, and come back and check this article again after I have had the PIWIS work done as I plan to update it then with a few more details.
|
|
Keywords:
|
PCM install CDR-24 radio removal suncoast 2.1 |
|
|
|
 |
Admin & Founder
|
|
Posts: 28,331
Registered: August 2005
Location: Kansas
|
|
|
|
Author
|
|
suneet

Coordinator
Registered: July 2006
Location: FL
Posts: 2711
|
|
Review Date: Sat February 10, 2007
|
Would you recommend the product? Yes |
Price you paid?: None indicated
| Rating: 9
|
|
Pros:
|
Good article.
|
|
Cons:
|
N\A
|
|
Have you installed this Product or Mod?:
|
|
|
Just to add, those black clips are really easy to break (the ones you are supossed to turn 90 degrees). Mine weren't very effective at 90 degrees, so I turned them more and they just popped out. You can still do the removal, but you have to use a flat edge to push the metal clips yourself.
------------------------------
- Suneet

|
|

|
|
Sleeper

Site Donor
Registered: April 2006
Location: WA
Posts: 63
|
|
Review Date: Sat February 10, 2007
|
Would you recommend the product? Yes |
Price you paid?: None indicated
| Rating: 0
|
|
Pros:
|
|
|
Cons:
|
|
|
Have you installed this Product or Mod?:
|
|
|
I would like to know more about the Sport Chrono features that should be available on the PCM. I had a PCM and Nav installed in my car, which originally had a radio. The bar graphs you mentioned don't appear on my set either; in addition, the adjustments to lights and wipers are nonexistent. My dealer has contacted Porsche to get appropriate codes, but apparently Porsche does not have a solution yet- at least that is what my dealer is telling me. It looks like I need to bring these additional missing Sport Chrono features to my dealer's attention also.
|
|
|
|
|
eecsdude

Porsche Activist
Registered: December 2005
Posts: 253
|
|
Review Date: Sat February 10, 2007
|
Would you recommend the product? Yes |
Price you paid?: None indicated
| Rating: 0
|
|
Pros:
|
|
|
Cons:
|
|
|
Have you installed this Product or Mod?:
|
|
|
It's interesting to see that even the non-BOSE cars have a fiber optic connection to the headunit. I thought it was a BOSE only thing, and the one reason why it is hard for us to get 3rd party headunits in there.
|
|
|
|
|
smounic

Coordinator
Registered: May 2006
Location: Mississippi
Posts: 1746
|
|
Review Date: Sun February 11, 2007
|
Would you recommend the product? Yes |
Price you paid?: None indicated
| Rating: 0
|
|
Pros:
|
|
|
Cons:
|
|
|
Have you installed this Product or Mod?:
|
|
|
Great article, but I'd like to see the part numbers that you used given that you didn't install the full kit. I'd also like to see the pricing, but I understand if it can't be displayed.
------------------------------
"The Cayman doesn't need any more toys." -- My wife
|
|
|
|
|
gmorat
Porsche Specialist
Registered: February 2006
Posts: 655
|
|
Review Date: Sun February 11, 2007
|
Would you recommend the product? Yes |
Price you paid?: None indicated
| Rating: 0
|
|
Pros:
|
|
|
Cons:
|
|
|
Have you installed this Product or Mod?:
|
|
|
Hey.
I made a balls of trying to get the head unit out of the car. The little black locking clippy things came loose and fell out and I can't figure out how to hold down the four clips at the smae time to remove the unit
Balls.
G.
|
|
|
|
|
gmorat
Porsche Specialist
Registered: February 2006
Posts: 655
|
|
Review Date: Mon February 12, 2007
|
Would you recommend the product? Yes |
Price you paid?: None indicated
| Rating: 0
|
|
Pros:
|
|
|
Cons:
|
|
|
Have you installed this Product or Mod?:
|
|
|
The last restraining bolt is 7mm.
G.
|
|
|
|
|
| |
Page: 1 · 2 · 3 · 4 · 5 · 6 |  |
|
|
|
Statistics
|
| Users |
27,884 |
| Products |
412 |
| Reviews |
1,147 |
| Views |
6,749,272 |
| « |
April 2013 |
|
| Sun | Mon |
Tue | Wed |
Thu | Fri |
Sat | | | 1 | 2 | 3 | 4 | 5 | 6 | | 7 | 8 | 9 | 10 | 11 | 12 | 13 | | 14 | 15 | 16 | 17 | 18 | 19 | 20 | | 21 | 22 | 23 | 24 | 25 | 26 | 27 | | 28 | 29 | 30 | | | | |
|


 tips:Back-up cam, power")
